Get StreamFluent
Running in OBS
Install the plugin, connect your mic, and start streaming in any language — takes about 5 minutes.
Download the Plugin
Choose your platform to get started
Prerequisites
Install the Plugin
Download the pre-built plugin and copy it into OBS's plugins folder. No compilation needed.
macOS
- 1.Download streamfluent-obs-macos-arm64.zip or streamfluent-obs-macos-x86_64.zip
- 2.Extract and copy
streamfluent-obs.plugininto:
~/Library/Application Support/obs-studio/plugins/
Windows
- 1.Close OBS, then download and run the
.exeinstaller - 2.Reopen OBS and go to DocksStreamFluent.ai
Linux
~/.config/obs-studio/plugins/streamfluent-obs/
In OBS
Open the Dock
The plugin adds a dockable control panel to OBS where you manage your connection, languages, and settings.
In OBS, open the dock via the menu bar:
Authentication
Log In to StreamFluent
Log in with Google, Twitch, Kick, or your email directly in the plugin, then hit Connect. You can also use an API key if you prefer.
Authentication
or use an API key from Dashboard → Settings
Choose Target Languages
In the Settings section of the dock, select one or more target languages. The plugin creates a separate dubbed audio track for each language you pick.
Configure
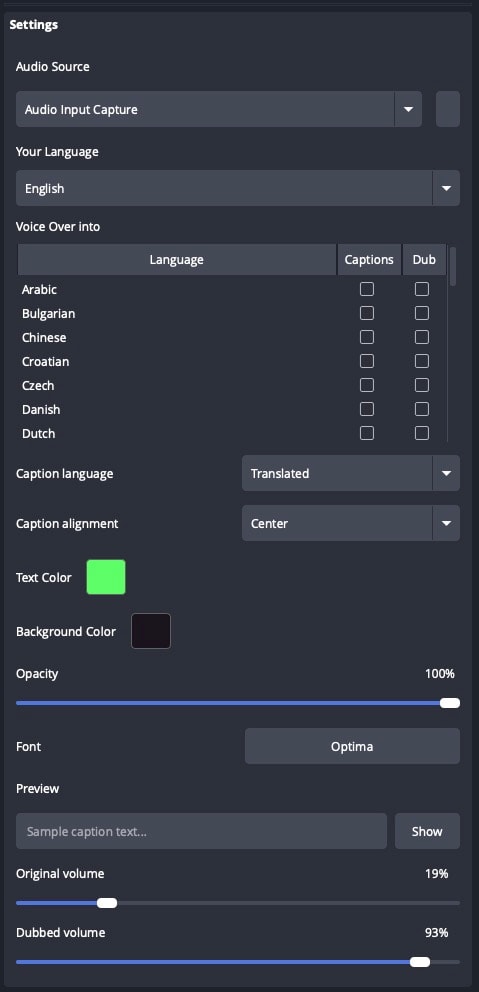
Set Up Audio, Languages & Captions
Use the StreamFluent dock to pick your audio source, choose target languages, and customize how captions look on stream.
- 1In the StreamFluent dock, open the Audio Source dropdown and select the microphone or audio input you want to use for dubbing and captions
- 2Under Voice Over into, select one or more target languages — the plugin creates a separate dubbed audio track and caption source for each
- 3Enable Captions and customize the text color, background color, opacity, font, and alignment to match your stream's look
- 4Adjust the Original volume and Dubbed volume sliders to balance your voice with the AI dub
Outputs
Add Dubbed Audio & Captions
The plugin creates virtual sources for each target language. Add them to your scene to use the dubbed audio and live captions.
Dubbed Audio Track
A source called StreamFluent Dub — [Language] is automatically created for each target language. To hear it in your stream:
- 1.In the Audio Mixer, click the gear ⚙️ next to it → Advanced Audio Settings
- 2.Assign it to a separate audio track (e.g. Track 2) to keep the dubbed audio separate from your original
Live Captions (optional)
A text source called StreamFluent Captions — [Language] auto-updates with live translated captions. Add it to your scene like any other text source:
- 1.In your Sources panel, click + → look for
StreamFluent Captions — [Language] - 2.Position and style it in your scene — font, size, background are all editable in source properties
Game Capture
game_capture
Audio Input Capture
coreaudio_input_capture
StreamFluent Dub — Spanish
streamfluent_dubbed_source
StreamFluent Captions — Spanish
text_ft2_source
Go Live
Connect & Stream
Hit Connect in the StreamFluent dock, then start your stream in OBS as normal.
Full stream checklist
Watch the dock status
The dot turns green when connected and authenticated. Transcripts appear in the dock in real time once audio is flowing.
Help
Troubleshooting
Plugin doesn't appear in OBS after installing
Fully quit and relaunch OBS. Check the file is in the correct plugins folder for your OS. On macOS, run xattr -dr com.apple.quarantine streamfluent-obs.plugin if Gatekeeper is blocking it.
"SSL sockets are not supported on this platform"
This means the TLS plugin is missing. Reinstall the plugin — it includes the bundled TLS backend (libqsecuretransportbackend) required for wss:// connections.
Status stays orange / "Host not found"
Check your internet connection and that api.streamfluent.ai is reachable. If you're behind a corporate firewall, port 3002 may need to be allowed.
Connected but no transcription appearing
Make sure the StreamFluent Audio Capture filter is added to an active audio source (mic/aux). The filter must be on a source that's actually receiving audio.
"Failed to create source 'StreamFluent Dub — ...'" in logs
This is a harmless timing warning. OBS tries to restore the source before the plugin has registered it. The source is created successfully immediately after — check that it appears in your Sources panel.
Dubbed audio sounds delayed or choppy
AI dubbing has inherent latency (2–5 seconds). This is expected. For live streams, use a stream delay to sync dubbed audio with video.
Ready to stream in every language?
Sign up and log in directly from the plugin with Google, Twitch, Kick, or your email.